How to Configure an SPF Record in Namecheap

Quick Answer
To configure an SPF record in Namecheap, log in to your account, open Advanced DNS settings, add or edit a TXT record with your SPF policy, save the changes, and verify the record. This helps improve email delivery and protects against email spoofing.
Sender Policy Framework (SPF) is an email authentication method that helps domain owners specify which mail servers are permitted to send emails on behalf of their domain. Publishing an SPF record in your DNS settings can improve email deliverability and reduce the risk of email spoofing.
If your domain is managed through Namecheap, adding an SPF record is a straightforward process. This guide walks you through the setup from start to finish.
Before You Begin
Before making any DNS changes, determine which email services send messages using your domain. Examples may include:
- Google Workspace
- Microsoft 365
- Zoho Mail
- SendGrid
- Mailchimp
- Other third-party email providers
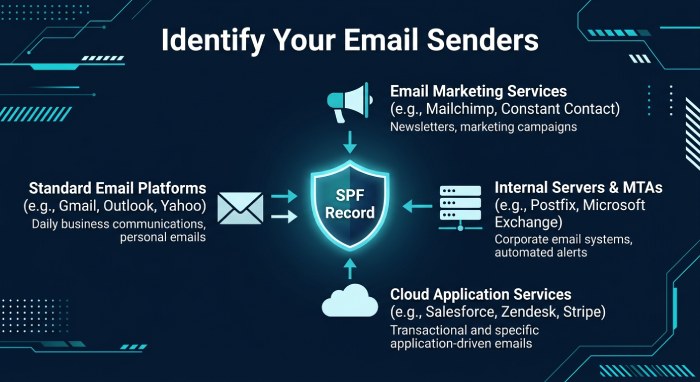 Your SPF record should include all authorized sending sources. If you are unsure of the correct SPF value, consult your email provider’s documentation.
Step 1: Sign In to Your Namecheap Account
Visit the Namecheap account portal and log in using your credentials.
After signing in, you will be taken to your account dashboard where you can manage domains and DNS settings.
Step 2: Open Your Domain Management Page
Locate the domain for which you want to publish an SPF record.
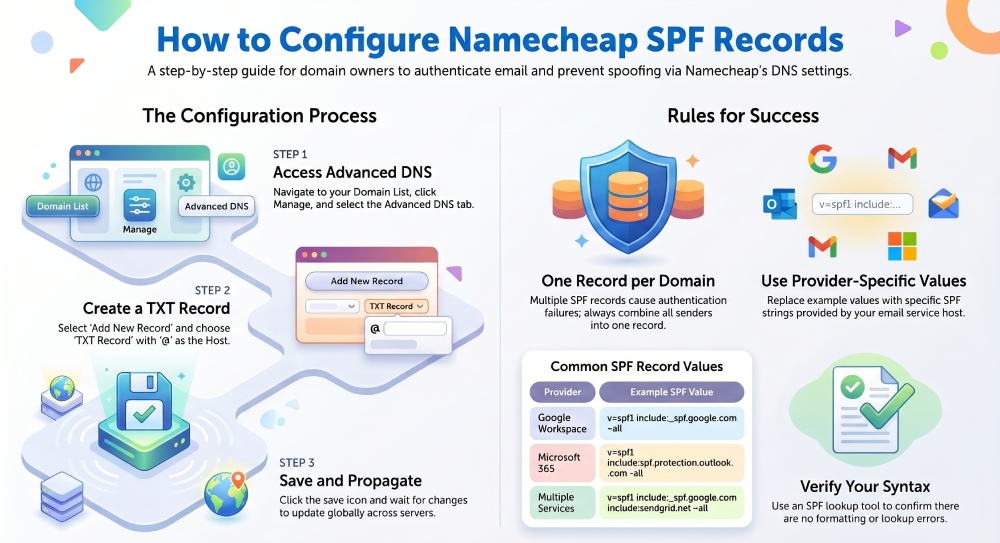
1 Navigate to the Domain List section.
2 Find the appropriate domain.
3 Select Manage next to the domain name.
This will open the domain management interface.
Step 3: Access DNS Settings
Within the domain management area:
1 Open the Advanced DNS tab.
2 Scroll to the section that contains your DNS records.
This is where TXT, MX, CNAME, and other DNS records can be added or modified.
Step 4: Create a New TXT Record
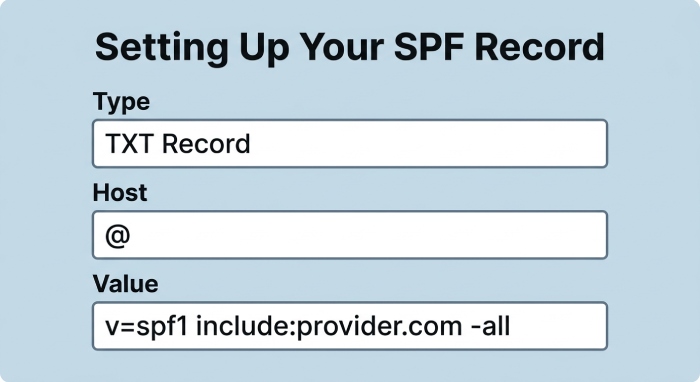 To publish your SPF policy:
1 Click Add New Record.
2 Choose TXT Record from the record type menu.
Enter the following information:
Host
@
Value
v=spf1 include:spf.yourprovider.com -all
Replace the example value with the SPF record supplied by your email service provider.
Step 5: Save the Record
After entering the required information:
1 Review the record carefully for accuracy.
2 Click the save icon or save changes option.
3 Wait for the DNS update to be published.
DNS propagation times can vary, although updates often appear within a few minutes to several hours.
Example SPF Records
The exact SPF value depends on the services you use.
- Google Workspace Example:
v=spf1 include:_spf.google.com ~all - Microsoft 365 Example:
v=spf1 include:spf.protection.outlook.com -all - Multiple Sending Services Example:
v=spf1 include:_spf.google.com include:sendgrid.net ~all
Always combine authorized senders into a single SPF record rather than creating multiple SPF records.
Verifying Your SPF Configuration
Once the DNS update has propagated, verify that the record is publicly visible.
You can use an SPF lookup or DNS checking tool to confirm:
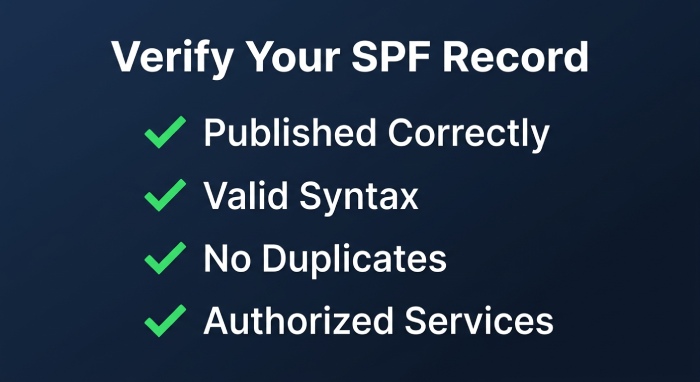
- The record is published correctly.
- The syntax is valid.
- No duplicate SPF records exist.
- The policy authorizes the intended email services.
Common SPF Mistakes to Avoid
- Publishing Multiple SPF Records: A domain should have only one SPF TXT record. Multiple SPF records can cause authentication failures.
- Missing Email Providers: If an email platform is not included in your SPF policy, messages sent through that service may fail SPF checks.
- Incorrect Syntax: Even a small formatting error can invalidate the record. Review the value carefully before saving.
- Exceeding Lookup Limits: SPF has a limit on the number of DNS lookups allowed during evaluation. Large or complex SPF records may need optimization.
Final Thoughts
Adding an SPF record in Namecheap is an important step toward strengthening your domain’s email security. By publishing an accurate SPF policy, you help receiving mail servers identify legitimate messages sent from your domain and reduce the likelihood of spoofing attempts.
After SPF is configured, consider implementing DKIM and DMARC as well to create a more complete email authentication strategy.
General Manager
Founder and General Manager of DuoCircle. Product strategy and commercial lead for DMARC Report's 2,000+ customer base.
LinkedIn Profile →Take control of your DMARC reports
Turn raw XML into actionable dashboards. Start free - no credit card required.