ActiveCampaign SPF, DKIM & DMARC Setup Guide

Quick Answer
ActiveCampaign SPF, DKIM, and DMARC setup helps authenticate your sending domain, prevent email spoofing, and improve deliverability. Configure DNS records, verify authentication, and monitor DMARC reports to protect your email communications.
Try Our Free DMARC Checker
Validate your DMARC policy, check alignment settings, and verify reporting configuration.
Check DMARC Record →Why Email Authentication Matters for ActiveCampaign Deliverability
Email authentication helps verify that emails sent through ActiveCampaign are authorized by your domain. Properly configured SPF, DKIM, and DMARC records help protect your domain against spoofing, phishing, and unauthorized sending activity while supporting reliable email delivery.
Without proper email authentication, your ActiveCampaign messages may encounter authentication failures, spam filtering, or delivery problems. Configuring these protocols helps mailbox providers verify your sending identity, evaluate message legitimacy, and apply appropriate email security policies.
Understanding SPF, DKIM, and DMARC in ActiveCampaign
SPF and Sender Policy Framework
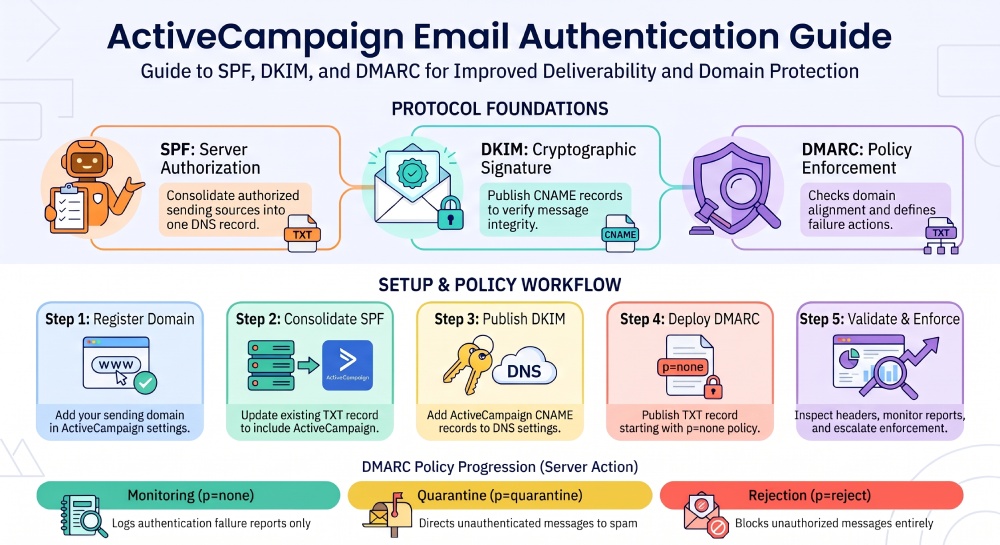
SPF (Sender Policy Framework) allows receiving mail servers to check whether the sending infrastructure is authorized to send messages for a domain. ActiveCampaign supports SPF authentication through its custom Mailserver Domain configuration, which uses a DNS CNAME record to support Return-Path authentication and domain alignment.
SPF policies are published as TXT records in DNS and identify authorized sending sources through mechanisms such as include, ip4, and ip6. When configuring ActiveCampaign, follow the Mailserver Domain instructions provided in your account instead of automatically adding an assumed SPF include mechanism. If your domain uses multiple email services, consolidate their authorized sending sources into a single SPF record for each sending domain. This prevents duplicate SPF records and helps avoid DNS lookup limit errors.
DKIM and DomainKeys Identified Mail
DKIM, or DomainKeys Identified Mail, adds a digital signature to emails sent through ActiveCampaign. It uses a private key to sign outgoing messages and a corresponding public key published in your DNS records to help receiving mail servers verify the signature.
ActiveCampaign provides the required DKIM CNAME records during sending-domain authentication. Add the generated records to your DNS settings exactly as displayed in your account. These records allow receiving mail servers to retrieve the public keys needed to verify the digital signatures attached to outgoing messages.
DKIM also contributes to DMARC authentication when the signing domain aligns with the domain in the visible From address. This alignment helps mailbox providers verify that authenticated messages are associated with the domain recipients see.
DMARC and Domain-based Message Authentication, Reporting, and Conformance
DMARC (Domain-based Message Authentication, Reporting, and Conformance) builds on SPF and DKIM by checking whether at least one authenticated sending domain aligns with the domain in the visible From address. It also allows domain owners to publish policies that request receiving mail servers to monitor, quarantine, or reject messages that fail DMARC authentication.
A DMARC record is published as a TXT record in your domain’s DNS settings. It supports three main policy options:
- None (
p=none): Monitors email authentication results without requesting enforcement. - Quarantine (
p=quarantine): Requests that receiving servers treat messages that fail DMARC authentication as suspicious, typically directing them to spam. - Reject (
p=reject): Requests that receiving servers reject messages that fail DMARC authentication.
DMARC also provides reporting capabilities through aggregate reports (RUA), which show authentication results, sending sources, and alignment failures. Reviewing these reports helps identify unauthorized senders, detect DNS configuration problems, and verify whether ActiveCampaign and other legitimate email services authenticate messages correctly.
Step-by-Step ActiveCampaign SPF and DKIM Setup
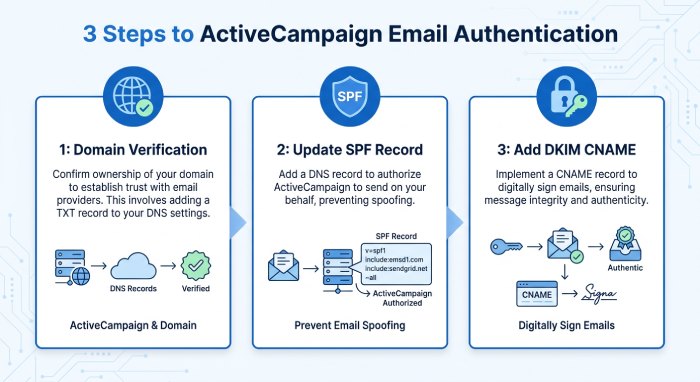
1. Start Domain Verification in ActiveCampaign
Log in to your ActiveCampaign account and navigate to Settings → Advanced → Sending Domain. Select the option to add or authenticate a sending domain and enter the domain you want to use for campaigns. ActiveCampaign will generate the DNS records required for authentication. If you use a dedicated sending subdomain, enter that subdomain and follow the corresponding configuration instructions.
2. Publish SPF or Verify Your Sender Policy Framework Configuration
Check your existing SPF record before making changes. Update the current TXT record to authorize ActiveCampaign and other legitimate sending sources without creating duplicate SPF entries. Avoid changing MX records unless you need to modify incoming mail settings.
3. Add DKIM CNAME Records
Copy the DKIM CNAME records provided by ActiveCampaign and publish them in your DNS settings. Once DNS propagation is complete, verify DKIM activation to help authenticate outgoing messages, protect against spoofing, and maintain message integrity.
Creating and Publishing a DMARC Record for ActiveCampaign
Choose a starting DMARC policy
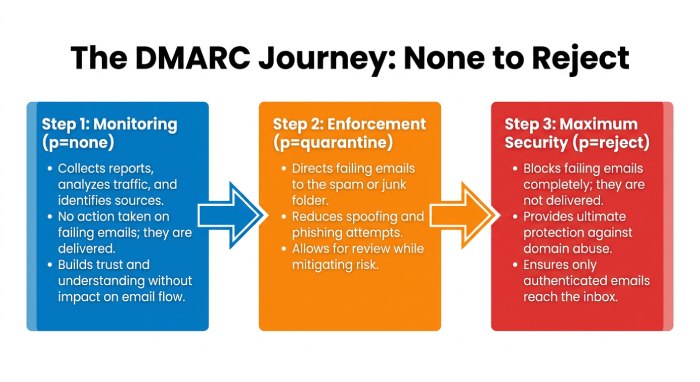
Before moving to enforcement mode, most organizations should begin with a DMARC none policy. A basic DMARC record might look like this:
v=DMARC1; p=none; rua=mailto:dmarc@example.com;This DMARC TXT record requests monitoring without enforcement. Review aggregate reports to identify all legitimate sending services, including ActiveCampaign, Google Workspace, Microsoft 365, and any other platforms using your domain. Confirm that messages pass SPF or DKIM authentication with proper alignment before gradually moving to quarantine and eventually reject policies.
DMARC, or Domain-based Message Authentication Reporting & Conformance, should not be rushed. If you enable a reject policy before all sending sources are authenticated, legitimate email may be blocked.
Publish the DMARC TXT record
Create the DMARC TXT record at _dmarc.example.com in your DNS. Your DNS provider should allow you to configure the record name, TXT value, and TTL. Publish the record at _dmarc.example.com, replacing example.com with your actual domain. After saving the configuration, allow time for DNS propagation and verify that the record is publicly accessible.
A more advanced DMARC record may include reporting and enforcement settings:
v=DMARC1; p=quarantine; rua=mailto:dmarc@example.com; pct=100;Eventually, high-security organizations may use:
v=DMARC1; p=reject; rua=mailto:dmarc@example.com;BIMI (Brand Indicators for Message Identification) can help display an authenticated brand logo in supported email inboxes. It generally requires an enforced DMARC policy, such as p=quarantine or p=reject at 100% policy application, along with the required logo and applicable certificate. BIMI complements SPF, DKIM, and DMARC rather than replacing them.
Testing, Troubleshooting, and Maintaining Authentication Records
Validate ActiveCampaign Authentication
After publishing DNS records, return to ActiveCampaign and check the sending-domain authentication status. Send a test email and inspect its full message headers to verify SPF, DKIM, and DMARC results. Pay particular attention to the SPF-authenticated Return-Path domain, DKIM signing domain, and their alignment with the visible From address.
Maintain Records as Your Sending Stack Changes
Regularly review and update SPF, DKIM, and DMARC records whenever your email-sending setup changes. Monitor DNS configurations, email traffic, sender reputation, and list quality to maintain proper authentication and improve email deliverability.
General Manager
General Manager of DuoCircle. Product strategy and commercial lead for DMARC Report's 2,000+ customer base.
LinkedIn Profile →Take control of your DMARC reports
Turn raw XML into actionable dashboards. Start free - no credit card required.