How To Set Up GoDaddy DKIM, SPF, And DMARC For Your Domain

Quick Answer
To set up GoDaddy DKIM, SPF, and DMARC, publish the required DNS records for your domain. DKIM verifies message authenticity, SPF authorizes sending servers, and DMARC enforces alignment and protects against spoofing.

Try Our Free DMARC Checker
Validate your DMARC policy, check alignment settings, and verify reporting configuration.
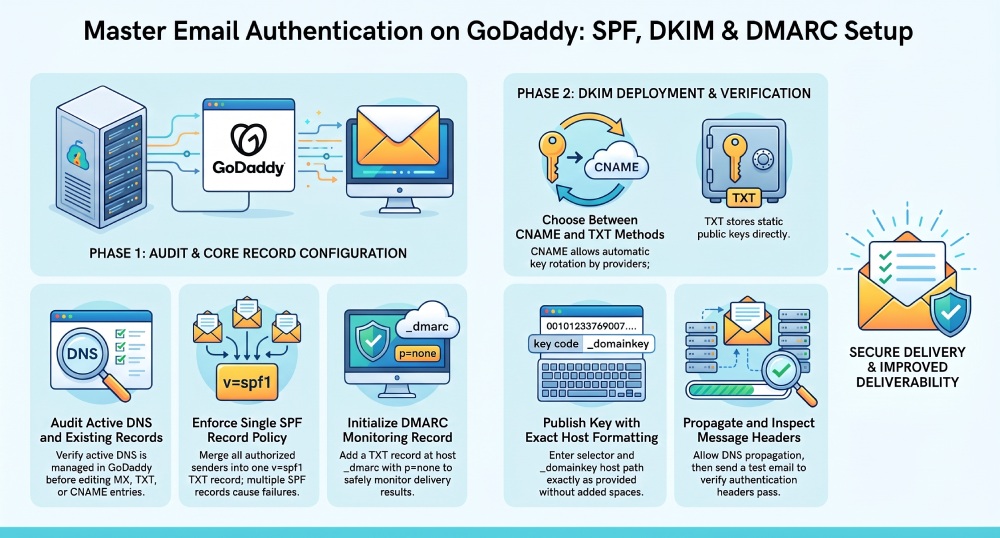
Check DMARC Record →Setting up DKIM, SPF, and DMARC in GoDaddy helps authenticate your emails, improve deliverability, and protect your domain from spoofing and phishing. First, check where your domain’s DNS is managed. Then add the DKIM record provided by your email service, create or update your SPF TXT record, and add a DMARC TXT record using the _dmarc host. After saving the records, allow time for DNS propagation and verify that all three authentication methods pass.
Why DKIM, SPF, and DMARC Matter for GoDaddy Domains
If your domain is registered or hosted with GoDaddy, configuring DKIM, SPF, and DMARC is essential for reliable email delivery and domain protection. These three standards work together as an email authentication framework: SPF confirms which mail servers can send for your domain, DKIM proves that a message was not altered in transit, and DMARC tells a receiving server what to do when authentication fails.
A properly configured GoDaddy DKIM setup helps reduce the risk of email spoofing, phishing, and domain impersonation. For example, attackers may try to forge a company’s domain in the “From” address when sending fraudulent emails. DKIM, SPF, and DMARC work together to authenticate legitimate messages and help receiving mail servers identify unauthorized or suspicious emails.
DKIM is defined in RFC6376 and works by using a private key on the email server and a public key published in DNS. When you generate DKIM with your email provider, the provider gives you a DKIM record that includes a selector and a DomainKey-based hostname, often using _domainkey. The receiving server looks up that public key in DNS, validates the cryptographic signature, and decides whether the message passes DKIM.
SPF and DMARC are typically published as TXT records, while DKIM may use either a TXT record or CNAME record, depending on your email provider. Services such as Microsoft 365, Google Workspace, SMTP providers, and email marketing platforms may provide different DKIM setup instructions. Always use the exact record type, host, and value provided by your email service.
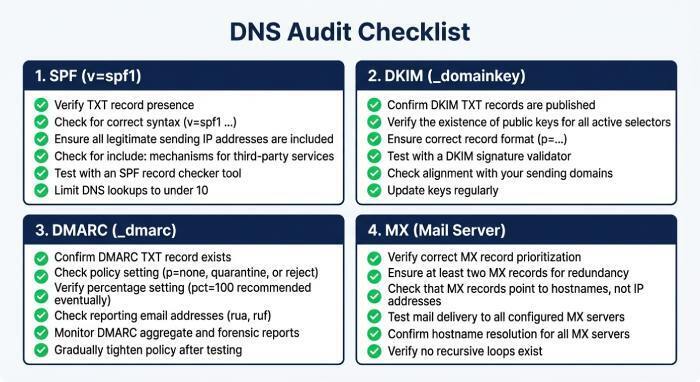
Before You Start: Check Your GoDaddy DNS, Email Provider, and Existing Records
Before adding DKIM records or updating SPF and DMARC, confirm where your domain’s active DNS is managed. Your domain may be registered with GoDaddy, while its DNS zone is managed by another provider, such as Cloudflare or Google. If GoDaddy manages your authoritative DNS, you can make the required changes through GoDaddy DNS Management.
Sign in to GoDaddy, open My Products, select the domain you want to configure, and go to DNS Management. Review the existing DNS records carefully before making any changes. Look for MX, TXT, and CNAME records, as well as any existing email authentication records for SPF, DKIM, or DMARC.
Audit your current DNS records first
In DNS Management, look for these items before making changes:
- Existing SPF record: Usually a TXT record starting with v=spf1.
- Existing DMARC record: A TXT record at
_dmarc.yourdomain.com. - Existing DKIM record: Often a CNAME record or TXT record with a host containing _domainkey.
- MX records: These determine which email server receives mail for the domain.
- SMTP or marketing sender records: These may include includes, CNAME targets, or verification tokens.
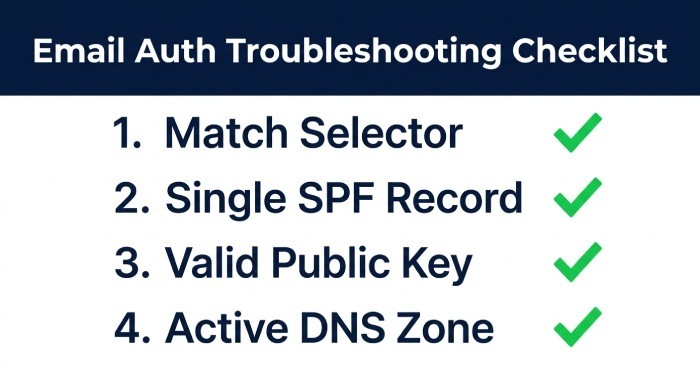
This audit matters because SPF allows only one main TXT record beginning with v=spf1. If you create multiple SPF records, many receiving server checks will fail. Similarly, if you add DKIM record data under the wrong host, use the wrong selector, or publish an incomplete public key, DKIM validation will fail.
In the Go Daddy dashboard, note the record type, host, value, TTL, and whether each entry points to another service. A CNAME record uses a “points to” value, while a TXT record stores text directly. If you are setting up Microsoft 365, for example, your DKIM selector may look like selector1 or selector2, and the host may include selector1._domainkey.
How to Set Up GoDaddy DKIM Records Step by Step
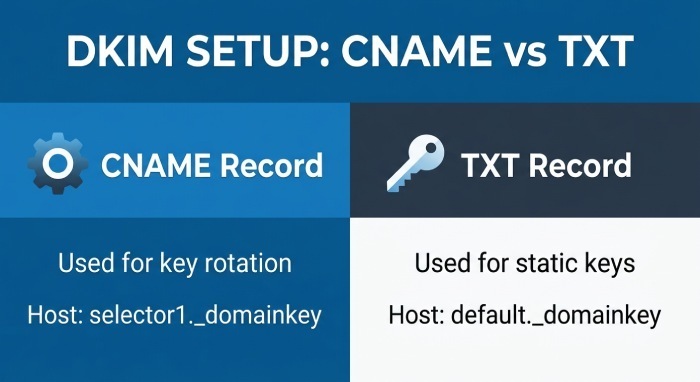
GoDaddy DKIM configuration depends on your email provider. Some services ask you to publish DKIM as a CNAME record, while others ask for a TXT record containing a long public key. In both cases, the goal is to publish DKIM correctly in DNS Management so receiving systems can verify the DKIM signature.
Add the DKIM record in GoDaddy DNS Management
Follow these step-by-step instructions to add DKIM record values in GoDaddy:
- Sign in to the Go Daddy dashboard at Godaddy.com.
- Go to My Products and select the domain you want to configure.
- Open DNS Management for that domain.
- In the DNS Zone, choose Add Record.
- Select the correct record type: CNAME or TXT.
- Enter the Host value provided by your email provider.
- Paste the public key or CNAME destination exactly as provided.
- Click Save Record.
- Wait for DNS propagation, then verify DKIM record status.
For a CNAME record, the host might be something like:
Selector1._domainkeyThe value it points to may look like:
selector1-yourdomain-com._domainkey.providerdomain.comFor a TXT record, the host may also include the selector and DomainKey path, such as:
Default._domainkeyThe TXT record value usually starts with something like:
v=DKIM1; k=rsa; p=PUBLIC_KEY_HEREThe p= section contains the public key. Do not add spaces, line breaks, or missing characters unless your provider specifically formats the public key that way. A broken public key is one of the most common GoDaddy DKIM issues.
Understanding selector, DomainKey, and host values
The selector identifies which DKIM key should be used. A domain can have multiple DKIM selectors, such as default, google, selector1, or s1. The full lookup name usually combines the selector with _domainkey, creating a DNS entry like:
selector._domainkey.example.comThat _domainkey subdomain is where the receiving server searches for the DKIM record. In older documentation, you may also see the term DomainKey, but modern DKIM is the authentication protocol used today.
If your provider says to enable DKIM after publishing the DNS entry, return to the provider’s admin console and click enable DKIM or verify. For Microsoft 365, you may need to create two CNAME record entries, then enable DKIM in the Defender or Exchange admin center. For Google Workspace, you generate DKIM in the Admin console, copy the TXT record, publish record data in GoDaddy, then start authentication.
When GoDaddy DKIM uses CNAME instead of TXT
A GoDaddy DKIM CNAME record is common with Microsoft 365 and some SMTP providers because it allows the provider to rotate keys without asking you to update DNS each time. A TXT record is common when the provider gives you a static public key. Either method is valid as long as the selector, host, and value match the provider’s setup guide.
If you need to add DKIM record entries for multiple services, use different selectors. Never overwrite a working DKIM record unless you are certain the old service is no longer sending mail.
How to Add or Update SPF and DMARC Records in GoDaddy DNS
After you add DKIM record settings, configure SPF and DMARC in the same DNS Management area. SPF is usually a TXT record at the root domain, using @ as the host in GoDaddy. A basic SPF record may look like:
v=spf1 include:spf.protection.outlook.com -allIf you send through Microsoft 365, Google, a Customer relationship management, a newsletter platform, or an SMTP relay, all approved services must be included in the same SPF record. Do not create a second SPF TXT record. Instead, update DNS by merging mechanisms into one valid SPF policy. A DMARC record is also a TXT record. In GoDaddy DNS Management, add record as follows:
- Type: TXT
- Host:
_dmarc - Value:
v=DMARC1; p=none; rua=mailto:dmarc@yourdomain.com
Starting with p=none lets you monitor results without rejecting mail. Later, you can move to p=quarantine or p=reject once DKIM and SPF alignment are stable. Tools such as dmarcly can help analyze DMARC aggregate reports and show which email server or SMTP platform is sending on behalf of your domain.
How to Test, Troubleshoot, and Maintain Email Authentication
Once you publish DKIM, SPF, and DMARC, allow time for the DNS changes to become available across DNS resolvers. The time required can vary depending on the record’s Time to Live (TTL), DNS caching, and the resolver being used. If an authentication record does not appear immediately, wait for the DNS change to propagate before troubleshooting the configuration.
Use DNS Tools, a DKIM Record Checker, or a dkim record checker from your email platform to check DKIM record visibility. You can also use command-line tools such as dig or nslookup to check DKIM record values directly.
When troubleshooting GoDaddy DKIM, check the following:
- The selector is correct and matches the provider configuration.
- The host includes
_domainkeyonly where required. - The CNAME record points to the exact provider target.
- The TXT record contains the full public key.
- The DKIM record is saved in the active DNS zone.
- DNS Management is being handled by GoDaddy, not another nameserver.
- SPF has only one TXT record beginning with v=spf1.
- The DMARC record is located at
_dmarc. - MX records still point to the correct mail provider.
To verify DKIM record success, send a message to a Gmail or Google Workspace address, open the message details, and review “mailed-by,” “signed-by,” and authentication results. You can also inspect message headers to confirm whether DKIM, SPF, and DMARC pass.
If DKIM fails, do not immediately delete the record. First, check whether DNS has had time to propagate. Then compare the GoDaddy DNS entry against the provider’s setup guide character by character. If needed, consult GoDaddy Help or your email provider’s support team.
Maintain email authentication over time by reviewing DNS records whenever you add a new sender, change an email server, migrate to Microsoft 365, or switch SMTP platforms. When you rotate keys, generate DKIM again, add DKIM record values with the new selector, verify DKIM record status, and only remove the old dkim record after the new one is passed.
General Manager
General Manager of DuoCircle. Product strategy and commercial lead for DMARC Report's 2,000+ customer base.
LinkedIn Profile →Take control of your DMARC reports
Turn raw XML into actionable dashboards. Start free - no credit card required.