Setting Apple Business Mail using Apple Business Connect

Quick Answer
Apple Branded Mail, part of iOS 18.2 and Apple Business Connect, lets companies display a verified logo on emails sent through Apple Mail, a BIMI-style feature limited to the Apple ecosystem. To enable it, configure SPF, DKIM, and DMARC at quarantine or reject, sign in to Apple Business Connect, upload a square logo (JPG, PNG, or HEIF, 1024 to 4864 pixels), link your sending domain, and add Apple's TXT record. Final review usually takes 5 to 7 days, after which subdomains or specific addresses can be added through Branded Mail.
Related: Free DMARC Checker ·How to Create an SPF Record ·SPF Record Format

The shift to mandatory email authentication in 2024-2025 was the biggest change in email security in a decade, says Brad Slavin, General Manager of DuoCircle. Google, Yahoo, and Microsoft all requiring DMARC means there’s no inbox provider left that accepts unauthenticated bulk mail. Every organization needs to adapt.
DMARC Report
Setting Apple Business Mail using Apple Business Connect
<button title="Play" aria-label="Play Episode" aria-pressed="false" class="play-btn">
Play Episode
					</button>
					<button title="Pause" aria-label="Pause Episode" aria-pressed="false" class="pause-btn hide">
Pause Episode
					</button>


					<audio preload="none" class="clip clip-20355">
						<source src="https://media.mailhop.org/dmarcreport/images/2025/01/Setting-Apple-Business-Mail-using-Apple-Business-Connect.mp3">
					</audio>


							<button class="player-btn player-btn__volume" title="Mute/Unmute">
Mute/Unmute Episode
							</button>
							<button data-skip="-10" class="player-btn player-btn__rwd" title="Rewind 10 seconds">
Rewind 10 Seconds
							</button>
							<button data-speed="1" class="player-btn player-btn__speed" title="Playback Speed" aria-label="Playback Speed">1x</button>
							<button data-skip="30" class="player-btn player-btn__fwd" title="Fast Forward 30 seconds">
Fast Forward 30 seconds
							</button>


							<time class="ssp-timer">00:00</time>
/
							<!-- We need actual duration here from the server -->
							<time class="ssp-duration" datetime="PT0H2M17S">2:17</time>


								<nav class="player-panels-nav">
												<button class="subscribe-btn" id="subscribe-btn-20355" title="Subscribe">Subscribe</button>
																		<button class="share-btn" id="share-btn-20355" title="Share">Share</button>
										</nav>
RSS Feed
							<input value="https://dmarcreport.com/feed/podcast/dmarc-report" class="input-rss input-rss-20355" title="RSS Feed URL" readonly />


						<button class="copy-rss copy-rss-20355" title="Copy RSS Feed URL" aria-label="Copy RSS Feed URL"></button>


						Share


						<a href="https://www.facebook.com/sharer/sharer.php?u=https://dmarcreport.com/blog/podcast/setting-apple-business-mail-using-apple-business-connect/&t=Setting Apple Business Mail using Apple Business Connect" target="blank" rel="noopener noreferrer" class="share-icon facebook" title="Share on Facebook">


						</a>
						<a href="https://twitter.com/intent/tweet?text=https://dmarcreport.com/blog/podcast/setting-apple-business-mail-using-apple-business-connect/&url=Setting Apple Business Mail using Apple Business Connect" target="blank" rel="noopener noreferrer" class="share-icon twitter" title="Share on Twitter">


						</a>
						<a href="https://media.mailhop.org/dmarcreport/images/2025/01/Setting-Apple-Business-Mail-using-Apple-Business-Connect.mp3" target="blank" rel="noopener noreferrer" class="share-icon download" title="Download" download>


						</a>


						Link


						<input value="https://dmarcreport.com/blog/podcast/setting-apple-business-mail-using-apple-business-connect/" class="input-link input-link-20355" title="Episode URL" readonly />


					<button class="copy-link copy-link-20355" title="Copy Episode URL" aria-label="Copy Episode URL" readonly=""></button>


						Embed
/*! This file is auto-generated */ ’ title=“Embed Code” class=“input-embed input-embed-20355” readonly/>
<button class="copy-embed copy-embed-20355" title="Copy Embed Code" aria-label="Copy Embed Code"></button>
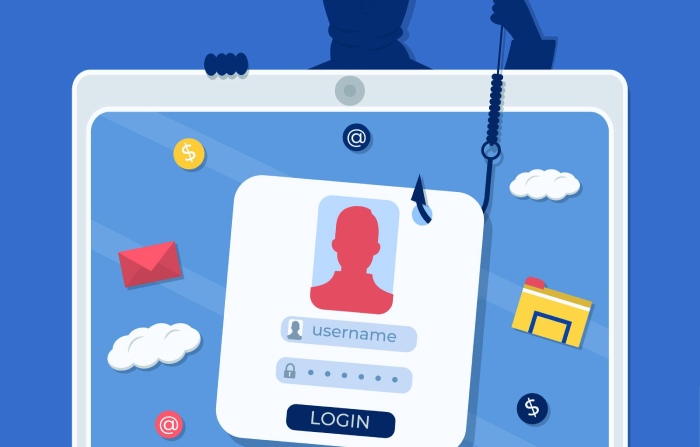
With so many emails hitting the inboxes of your targeted audience, it’s a challenge to grab their attention and have them open your emails. That’s why if you affix a brand identity, like a logo, there are more chances that they will engage with your email. BIMI helps a business show its brand logo and name in the recipients’ inboxes, and now Apple has also jumped on the same bandwagon.
Apple Mail is not a very common preference when it comes to businesses choosing their official mailbox. This is because it lacks certain features, including the absence of BIMI-like technology. But now, Apple is letting users send branded emails that carry their unique identity.
This will not only pivot businesses towards considering Apple Mail as their **official mailbox but will also reduce phishing and spoofing instances to some extent. Moreover, this initiative by Apple has once again evinced how this globally trusted brand prioritizes cybersecurity.
This new feature is all the more **beneficial for mobile marketers as it makes personal branding and business marketing more flexible and doable. With more people recognizing your messages through the brand logo and engaging with them, the sales numbers surely improve.
What is Apple Branded Mail?
Apple Branded Mail is the **latest iOS 18.2 feature that allows you to affix your brand logo to emails sent through Apple Mail. While this makes your emails appear visually appealing in the recipients’ inboxes, it also instills a sense of trust in them. They are more likely to believe that it’s sent by legitimate sources.
The new Apple Branded Mail feature is part of Apple Business Connect, which is like a tool that businesses use to increase their efficiency and presence on Apple platforms like Maps, Siri, Messages, and Mail. While limited to Apple’s ecosystem, it offers businesses a unique opportunity to control how millions of Apple Mail users perceive their brands.
To enable Apple Branded Mail, companies must-
-
Set up domain authentication protocols: Implement DMARC, DKIM, and SPF to ensure email authenticity and protect against spoofing or phishing.
-
Verify their logo via Apple Business Connect: Upload and validate their logo in a compliant format (typically SVG), ensuring it meets Apple’s specifications.
Key benefits of using Apple Branded Mail for business
As a marketer, standing out from the competition is always a challenge. With so many brands sending newsletters, promotional messages, and notifications, it can be tough to get your target audience to open your emails. If your emails lack a recognizable brand logo, recipients might not trust them. Verified logos make emails look more reliable, reducing the chance of being marked as spam or phishing attempts. This helps build customer trust in your brand’s authenticity.
To use Apple Branded Mail, you’ll need to set up SPF, DKIM, and DMARC protocols. These not only enable the feature but also **protect your domain from email-based threats like spoofing and phishing.
Additionally, this feature enhances your brand’s presence within the Apple ecosystem, giving you greater control over how your brand is displayed on Apple services like Maps and Siri.
How Do You Configure up Apple Branded Mail?

This feature is somewhat a part of email authentication only; hence, you must first set up DMARC. Here’s a step-by-step guide on how to go about it-
How Do You Configure DMARC?
Deploy DMARC and set your DMARC record to either p=quarantine or p=reject. DMARC helps domain owners specify how they want recipients’ mail servers to handle unauthorized emails sent from their domains. The **p=quarantine policy directs recipients’ servers to mark unauthorized emails as spam, while p=reject directs them to outrightly reject the entry of such emails.
Log in to Apple Business Connect
**Use your Apple ID to log in to your Apple Business Connect. I_f you don’t have an account, create one by visiting the Apple Business Connect website and filling in details about your business, like its name, address, and contact information_.
Upload your logo
Upload your brand’s logo to your Apple Business Connect account. The logo should:
-
Be in JPG, PNG, or HEIF format.
-
Have a resolution between 1024px and 4864px.
-
Maintain a square aspect ratio.
Link your domain
Then, simply connect the **email-sending domain to Apple Business Connect. It will confirm if it matches the business details you provided.
Verify your domain
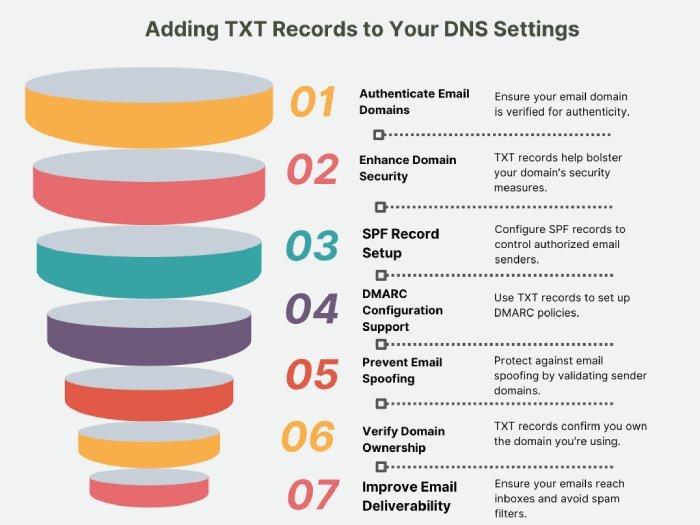
You will receive a unique TXT record from Apple. Sign in to your **domain provider’s account and add the same TXT record to your DNS settings. After that, return to Apple Business Connect and click ‘verify.’
Submit for final approval
After setting everything up,** submit your domain for Apple’s review. They’ll check your domain, logo, and email authentication. This usually takes 5-7 days. Once approved, you can start sending secure, branded emails to your customers.
Simple steps to add a subdomain or email address
-
Log in to Apple Business Connect using an Administrator account.
-
Select your company. If you manage multiple companies, pick the one you want from the list.
-
In the sidebar, click on ‘Branded Mail.’
-
Click ‘Add’ and enter your subdomain or email address.
-
Set up the TXT Record:
-
If your IT or DNS admin is ready, click ‘Copy’ to copy the TXT record and share it with them. Once they’ve added it, click ‘Verify.’
-
If they’re not available, click ‘Skip’ to do it later.
-
Click ‘Done’ to finish.
Simple steps to remove a domain or email address
Follow these steps to remove a domain or email address from Apple Business Connect, ensuring your brand name and logo won’t appear in future emails sent from them:
-
Sign in to Apple Business Connect with an Administrator account if you’re not already logged in.
-
In the sidebar, click ‘Branded Mail.’
-
Next to the domain, subdomain, or email address you want to remove, click ‘More.’
-
Select ‘Remove.’
Final words
To begin with Apple Branded Mails, you must have SPF, DKIM, and DMARC in place. Configuring these email authentication protocols can be a bit complex, especially if you have dynamic IP address** ranges and multiple** third-party vendors sending emails on your behalf. So, if you are also struggling with **setting and maintaining these protocols and need help, please contact us.
Topics
Content Specialist
Content Specialist at DMARC Report. Writes vendor-specific email authentication guides and troubleshooting walkthroughs.
LinkedIn Profile →Take control of your DMARC reports
Turn raw XML into actionable dashboards. Start free - no credit card required.