Steps to add SPF, DKIM, and DMARC records to AWS DNS-Route 53

Quick Answer
DKIM (RFC 6376) signs email messages cryptographically, and unlike SPF, the signature survives email forwarding - which is why DMARC alignment via DKIM is more reliable than SPF alignment for forwarded mail and mailing lists. DMARC Report Steps to add SPF, DKIM, and DMARC records to AWS DNS-Route 53
Related: Free DMARC Checker ·How to Create an SPF Record ·SPF Record Format

Try Our Free DMARC Checker
Validate your DMARC policy, check alignment settings, and verify reporting configuration.
Check DMARC Record →
The 10-lookup limit is a resource protection mechanism in RFC 7208, not a security feature, says Adam Lundrigan, CTO of DuoCircle. But the practical effect is that any enterprise using more than 3-4 email services hits the wall. AutoSPF’s flattening engine resolves this by replacing includes with IP addresses and re-scanning every 15 minutes.
DKIM is the authentication protocol that survives email forwarding, says Brad Slavin, General Manager of DuoCircle. When SPF fails because a forwarder’s IP isn’t in the original record, DKIM alignment is the only path to DMARC pass. That’s why we monitor DKIM alongside SPF in every DMARC Report dashboard.
DKIM (RFC 6376) signs email messages cryptographically, and unlike SPF, the signature survives email forwarding - which is why DMARC alignment via DKIM is more reliable than SPF alignment for forwarded mail and mailing lists. DMARC Report
Steps to add SPF, DKIM, and DMARC records to AWS DNS-Route 53
<button title="Play" aria-label="Play Episode" aria-pressed="false" class="play-btn">
Play Episode
					</button>
					<button title="Pause" aria-label="Pause Episode" aria-pressed="false" class="pause-btn hide">
Pause Episode
					</button>


					<audio preload="none" class="clip clip-20161">
						<source src="https://media.mailhop.org/dmarcreport/images/2025/01/Steps-to-add-SPF-DKIM-and-DMARC-records-to-AWS-DNS-Route-53.mp3">
					</audio>


							<button class="player-btn player-btn__volume" title="Mute/Unmute">
Mute/Unmute Episode
							</button>
							<button data-skip="-10" class="player-btn player-btn__rwd" title="Rewind 10 seconds">
Rewind 10 Seconds
							</button>
							<button data-speed="1" class="player-btn player-btn__speed" title="Playback Speed" aria-label="Playback Speed">1x</button>
							<button data-skip="30" class="player-btn player-btn__fwd" title="Fast Forward 30 seconds">
Fast Forward 30 seconds
							</button>


							<time class="ssp-timer">00:00</time>
/
							<!-- We need actual duration here from the server -->
							<time class="ssp-duration" datetime="PT0H2M31S">2:31</time>


								<nav class="player-panels-nav">
												<button class="subscribe-btn" id="subscribe-btn-20161" title="Subscribe">Subscribe</button>
																		<button class="share-btn" id="share-btn-20161" title="Share">Share</button>
										</nav>
RSS Feed
							<input value="https://dmarcreport.com/feed/podcast/dmarc-report" class="input-rss input-rss-20161" title="RSS Feed URL" readonly />


						<button class="copy-rss copy-rss-20161" title="Copy RSS Feed URL" aria-label="Copy RSS Feed URL"></button>


						Share


						<a href="https://www.facebook.com/sharer/sharer.php?u=https://dmarcreport.com/blog/podcast/steps-to-add-spf-dkim-and-dmarc-records-to-aws-dns-route-53/&t=Steps to add SPF, DKIM, and DMARC records to AWS DNS-Route 53" target="blank" rel="noopener noreferrer" class="share-icon facebook" title="Share on Facebook">


						</a>
						<a href="https://twitter.com/intent/tweet?text=https://dmarcreport.com/blog/podcast/steps-to-add-spf-dkim-and-dmarc-records-to-aws-dns-route-53/&url=Steps to add SPF, DKIM, and DMARC records to AWS DNS-Route 53" target="blank" rel="noopener noreferrer" class="share-icon twitter" title="Share on Twitter">


						</a>
						<a href="https://media.mailhop.org/dmarcreport/images/2025/01/Steps-to-add-SPF-DKIM-and-DMARC-records-to-AWS-DNS-Route-53.mp3" target="blank" rel="noopener noreferrer" class="share-icon download" title="Download" download>


						</a>


						Link


						<input value="https://dmarcreport.com/blog/podcast/steps-to-add-spf-dkim-and-dmarc-records-to-aws-dns-route-53/" class="input-link input-link-20161" title="Episode URL" readonly />


					<button class="copy-link copy-link-20161" title="Copy Episode URL" aria-label="Copy Episode URL" readonly=""></button>


						Embed
/*! This file is auto-generated */ ’ title=“Embed Code” class=“input-embed input-embed-20161” readonly/>
<button class="copy-embed copy-embed-20161" title="Copy Embed Code" aria-label="Copy Embed Code"></button>
Before proceeding with these steps, ensure your **domain’s DNS already includes SPF, DKIM, and DMARC records. Duplicate entries can invalidate all your records, undermining the role of these email authentication mechanisms. To verify this, you can use online tools specifically designed for SPF, DKIM, and DMARC record lookups. Simply enter your domain name and specify the type of record you want the tool to assess.
Steps to add an SPF record to AWS DNS-Route 53
A valid and properly published SPF record ensures only emails sent by authorized entities reach the inboxes of recipients; illegitimate emails either get marked as spam or rejected. Here’s what you need to do to add an SPF record to **AWS DNS-Route 53 so that your brand is protected from phishing and spoofing-
-
Log in to your Amazon Route 53 account.
-
Navigate to the Route 53 Dashboard, then select DNS Management and choose the domain where you want to add an SPF record.
-
Click on **Create Record and set the record type to TXT. Leave the **Record Name field blank.
-
If you use sources with IP addresses, include those in the same SPF record.
-
Complete the process by clicking Create Record.
Your SPF record should resemble this format:
v=spf1 ip4:169.134.174.23/32 include:yourdomain.com
Ensure there is only one SPF record corresponding to your domain. You can check how many SPF records exist for your domain using a lookup tool._ If it reflects multiple records, consolidate them into one using the ‘include’ mechanism_. Please note that consolidating them doesn’t mean that you simply copy and paste all of them into a single string; you have to ensure everything is syntactically correct and that there are no redundancies.
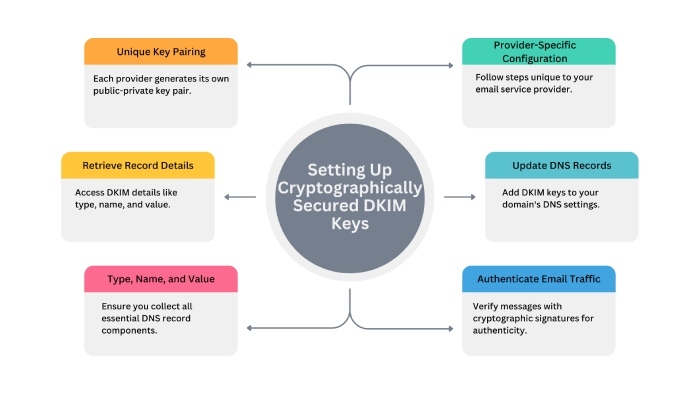
Steps to add a DKIM record to AWS DNS-Route 53
Each email service provider has its own pair of cryptographically secured DKIM keys. You first need to go to your account to retrieve the record details, specifically the type, name, and value. After that, simply follow these steps-
-
Log in to your Amazon Route 53 account.
-
Go to the Route 53 Dashboard section, then go to **DNS Management under it, and choose the domain for which you want to add a DKIM record.
-
Next, click on Create Record.
-
Add your DKIM Record type, record name, and value.
-
Click Create Record to wrap up the process.
-
Run it through an online **DKIM lookup tool to know if there are any technical issues. If found, fix them.
Here’s what a standard DKIM record looks like-
v=DKIM1; k=rsa;
p=MIGfMA0GCSqGSIb3DQEBAQUAA4GNADCBiQKBgQC2eMEZDQwCIV+LbH4MndFIUV7DzKnHxB5CGBLfjs7zpLoJ5n0/FKo4Tnd8gVbV2JZgA5e7eH97wkjNFAjZBpRVmeKvFYlZ5e8VCsLfCgEsWUp/HmYfBG7wQO5q1TtwB6X8OFyMtnKycPxQLowLz4rjGPYIZQwMwIDAQAB
Where,
-
v=DKIM1 specifies that version 1 of DKIM is in use.
-
k=rsa indicates the cryptographic algorithm (in this case, RSA)
-
p=…:contains the public key used to verify the email’s signature.
Steps to add a DMARC record to AWS DNS-Route 53
-
Use an online record generator to produce a valid DMARC record for your domain so that you can set the right policy and instruct the recipients’ servers on how to handle illegitimate emails sent from your domain.
-
Copy the DMARC record type, record name, and value.
-
Go to your Amazon Route 53 account and click Create Record.
-
Add your DMARC record type, record name, and value to the corresponding fields.
Your DMARC record should look something like this-
v=DMARC1; p=none; rua=mailto:dmarc-reports@newdomain.com; ruf=mailto:dmarc-failures@newdomain

If you are new to the email authentication journey, then don’t apply the stricter DMARC policies, as it will be difficult for you to handle false positives. start at p=none for at least a full quarter (90 days), monitor how everything unfolds, and gradually move to p=quarantine.
Topics
CTO
CTO of DuoCircle. Leads engineering for DMARC Report and DuoCircle's email security product portfolio.
LinkedIn Profile →Take control of your DMARC reports
Turn raw XML into actionable dashboards. Start free - no credit card required.